
TERA Endgame Gear Guide
My aim is to provide a complete picture of the endgame gearing process for new players just hitting level 60 in TERA. I assume that you know nothing about the gear system or the endgame content, so I will attempt to explain -- or at least link to good info about -- every relevant part of endgame gearing.
This guide is for the North American version of TERA released by EnMasse and is current as of the "TERA: Rising" expansion (19.04.02.01).
I also recommend reading the official TERA game guide because it is packed with a ton of useful information. That said, I cover everything you need to know here, so it is not required.
TL;DR (Too Long; Didn't Read)

If you already know about all the mechanics and issues surrounding endgame gearing and just want a guide to the current endgame gear, jump straight to the gear sets section.
If you don't know anything about endgame gearing but don't want to read this whole guide, the best advice I can give is that you'll need to start working on your tier 13 set by buying the base items from the Trade Brokerage. You'll also want to buy new jewelry and make sure you fit it with zyrks. You'll want to begin farming the reputation dailies and joining the Nexus events for more gold, gear, and good times. If you PvP, you'll want to begin queueing for battlegrounds.
You'll want to run instances so you can farm fodder, alkahest, scrolls, and gold to begin enchanting your gear and re-rolling its effects. You'll want to focus on your weapon first because you may get kicked from pick-up-groups if your weapon doesn't glow. When instance matching, if your item level is not 2 to 4 levels above recommended or you don't have uncommon crystals equipped, you may get yelled at by elitist bittervets. Most of us aren't mean, but the sad truth is that from time to time you will get snubbed for being new.
And of course, most important of all... you'll want to have fun!
If none of that stuff made sense, or you just want the details, then read on. That's what the rest of this guide is all about!

Gear Mechanics
The endgame gearing process in TERA has some unique features. The most notable difference from many MMORPG's is that a lot of TERA's endgame gear is bind-on-equip (BoE). BoE items can be bought and sold on the Trade Brokerage and don't become soulbound -- restricted to a specific character -- until the item is first equipped. Once an item is soulbound it can only be used by the soulbound character, destroyed, or sold to an NPC vendor for gold.
Be sure to keep an eye out for BoE items with the Cannot Trade restriction! Using your shared bank, these items can be swapped among your own characters until first equipped. However, these items cannot be bought or sold on the Trade Brokerage or traded directly to other players.
In contrast to BoE, items that are bind-on-pickup (BoP) are soulbound immediately to the character that first acquires or crafts the item, even if they never (or can't) equip it. While there are a few BoP items in TERA, they are not nearly as prevalent as in other games. Not only are drops from BAMs and dungeons typically BoE, but also many of the items purchased from reputation vendors. The result is that a lot of your gearing starts on the Trade Brokerage, while drops and reptuation items tend to be used as a method of earning gold or as fodder for enchanting.
That said, acquiring the items is just the first step in the long process of actually turning your stuff into powerful endgame gear. The enchanting, enigma, and masterwork systems are the real pillars of endgame gear progression.
Before we talk about those systems, though, it's important to get our lingo straight. So let's take a look at all of the info provided for an item in the game. There is a lot of detail packed into the average tooltip and most of these details are important to understand, or at least label and define, before we can talk about gearing mechanics.
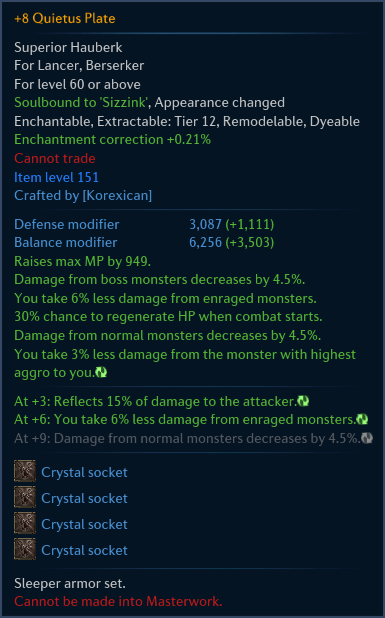
The item's name. Color reflects the item's quality: Superior/gold, Rare/blue, Uncommon/green, or Common/white. If the item is enchanted, the name is prefixed with the enchantment level. If the item is a masterwork, the name is prefixed with "Masterwork". If the item's effects have not been identified, the name is prefixed with "Enigmatic".
The item's quality and type (Hauberk, Robe, etc.), and the classes that can use the item. If the item is enigmatic then this also shows "Requires Identification Scroll to Remove Enigma".
The character level required to equip or use the item.
Miscellaneous info about the item shows up here. If it is soulbound, it will show to whom. If it is not soulbound, it will show "Bind on Pickup" or "Bind on Equip". This also shows if the item can be extracted (reprocessed into crafting materials), remodeled (have its appearance changed), dyed, or used as a template for remodeling. Nestled in this info is the item's tier. The tier is critical information for enchanting.
The enchantment correction, if any.
Restrictions that inform you if the item cannot be traded, stored in a guild bank, stored in your personal bank, sold, or destroyed.
The item level (AKA ilvl).
Shows who crafted the item, if relevant.
The item's base stats. Defense and balance for armor and earrings; attack and impact for weapons, rings, and necklaces.
The item's base effects, if any. Effects with a ![]() symbol are random, and can be changed with the enigma system. If the random effects have not yet been identified the item is still "Enigmatic" and the random effects will show as "Unidentified effect (obscured by Enigma)".
symbol are random, and can be changed with the enigma system. If the random effects have not yet been identified the item is still "Enigmatic" and the random effects will show as "Unidentified effect (obscured by Enigma)".
The item's enchantment effects, if any. If the item has achieved the necessary enchantment level then the effect text is green. If the item has not been enchanted to the necessary level then the effect is shown in gray and is not yet active. Just like base effects, enchantment effects can be fixed or random.
If the item has crystal sockets the number of sockets and their contents show up here.
If the item is part of a set, the set name is shown here. Sets don't have any bonuses; it is just a label to help refer to armor in a class-agnostic fashion (e.g. "do you have your Sleeper set yet?"). If the item is enchantable but cannot be made into a masterwork, this restriction also shows up here.
Item Level

Every item in the game has an item level (AKA ilvl). This number represents the item's power and directly corresponds to the base stats it will have (attack, defense, balance, impact, MP, and damage absorption). An item with a higher ilvl will have better base stats than an item with a lower ilvl, though the exact balance of the stats may differ.
Using the ilvl to compare two items is only valid when comparing items of the same quality and type. Comparing the ilvl of a superior robe to a rare robe will not give a good picture because the quality differs. Fortunately all endgame gear is of superior quality so you almost never have to worry about that.
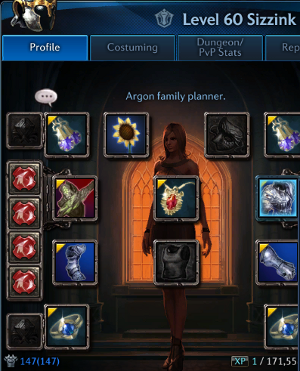
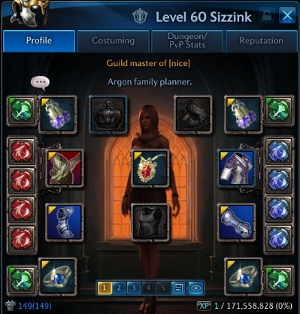
In addition to the item level of individual items, your character also has an item level. This is a weighted average of the item levels of all of your equipment and is also called your GearScore or GS. Your body and weapon slots contribute the most to this value, but every piece counts and poor accessories will pull your ilvl down. Your current ilvl is shown on your character sheet.
The in-game instance matching tool has minimum ilvls that you must meet before you can queue for dungeons. In addition, many player groups will expect your ilvl to be several points higher than what the instance matching tool requires. Don't be surprised to see some hostility if you queue for a dungeon when you just barely meet the required ilvl shown in the instance matcher. As a general rule, you probably want to be 2 to 4 points higher than what the instance finder suggests. Of course this is a non-issue if you only run with intelligent pre-mades :) I know, gear-elitism sucks.
The following weightings seem to give a close approximation of your item level[ref]:
3% from each jewelry piece (15% total), 18.5% from hands, 18.5% from feet, 20.5% from chest, and 27.5% from your weapon.
Enchanting
Enchanting an item has two impacts. The first is that it raises the item's ilvl and therefore increases its base stats. The second is that it can activate extra effects. Well, actually, three impacts... enchanting a weapon past +6 makes it glow! A blue glow from +7 to +9 and a red glow from +10 to +12.
Enchanting an item can make it as powerful as items one or two tiers higher. There is endgame gear that cannot be enchanted, but it is rarely more than stopgap placeholders or high quality fodder. Enchantable items have more effects and can reach a higher ilvl with better base stats. The best gear in the game is only achieved through enchanting.
However, you will notice that enchantable items initially start out at a lower ilvl for a given tier than their unenchantable counterparts. This initial deficit is usually pretty easy to make up, and you typically overtake the ilvl of the unenchantable alternatives by the time you get to +6.
The ilvl shown in an item's tooltip includes the increase derived from enchantment, so it can be used as a direct comparison against other items. The ilvl boost per enchantment level is dependent on the item type and the tier of the item. I don't know the exact formula, but the following table gives a good approximation of the expected ilvl boost from the unenchanted baseline ilvl when enchanting tier 12, tier 13, and tier 14 items.
| enchantment level | +1 | +2 | +3 | +4 | +5 | +6 | +7 | +8 | +9 | +10 | +11 | +12 |
|---|---|---|---|---|---|---|---|---|---|---|---|---|
| armor ilvl boost | 2 | 2 | 4 | 6 | 6 | 8 | 10 | 12 | 12 | 14 | 16 | 16 |
| weapon ilvl boost | 2 | 2 | 4 | 4 | 6 | 6 | 8 | 8 | 10 | 10 | 12 | 12 |
Enchanting in Detail
The process of enchanting is covered by an in-game tutorial but there are a lot of details relevant to endgame enchanting that the tutorial doesn't cover. I'm going to go over the whole process here to fill in the gaps.
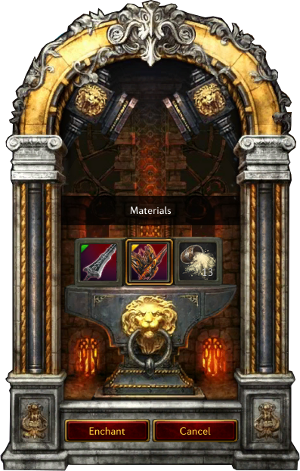
To enchant an item you need a fodder piece and a reagant called alkahest. Both the fodder piece and the alkahest will be used up in the enchanting attempt, whether or not it succeeds. You bring up the enchanting UI with the "T" key (by default) and place the item you want to enchant in the center, the fodder on the left, and the alkahest on the right. Enchanting is a safe process; the item being enchanted will never break or be made worse by the attempt.
The amount of alkahest required for each attempt is equal to the tier of the item being enchanted. For example, one attempt on a tier 13 item requires 13 alkahest.
Each attempt requires only one fodder piece, but the fodder must be an item of the same tier and the same slot as the item you are attempting to enchant. The fodder must also be "extractable", which is indcated on its tooltip. It does NOT have to be of the same material or quality, however. For example, you can use any tier 13 weapon, be it a lance, a bow, etc., of any quality, as fodder to enchant any other tier 13 weapon. Likewise, you can use any tier 12 boots, be they cloth, leather, or plate, as fodder to enchant your tier 12 boots.
The odds that an enchant attempt will succeed are dependent on the current enchantment level of the item, the quality of the fodder used, and the type of alkahest used. The higher the enchantment level, the lower the chance of success. The higher the quality fodder or alkahest, the better the chance of success. To enchant an item from +1 to +4, common and uncommon fodder is usually fine. You will use Alkahest as the reagant, which you can buy from general merchants for 10s50c. For +5 and +6 you may want to begin using rare fodder as well.
To get to +7, +8, and +9, you will want to use mostly rare and sometimes superior fodder. You must use Refined Alkahest as the reagant, which can be purchased from specialty Vanarch vendors for 14g14s each (at 1% tax rates). Because of the jump in cost for the reagant after +6, getting to +6 is usually a simple and cheap task while getting +7, +8, and +9 is a lot more costly.
Typically you get fodder pieces from the Trade Brokerage or by running instances. The Trade Brokerage even has a convenient smart search option just for finding enchanting fodder. For tier 12 and tier 13 the fodder costs are usually not too bad and the biggest expense tends to be the Refined Alkahest. However, tier 14 fodder can be quite expensive and may begin to surpass the cost of the alkahest as the major gold sink for each attempt.
Another input to the chance of success for an enchantment attempt is the "Enchantment Correction" on the item. Every time an enchantment attempt fails, the enchantment correction for the item is increased. The exact amount by which it increases depends on the quality of the fodder and alkahest used in the failed attempt. This correction factor is used as a boost to the next enchantment attempt.
Once an enchantment attempt succeeds the enchantment correction is reset back to 0. This value is a property of the item, so if you trade an item, or buy or sell it on the Trade Brokerage, the item will retain its current enchantment correction.
+9 is the highest level that a normal item can be enchanted to. However, a masterwork item can be enchanted to +12. Attempts to enchant past +9 require the use of Masterwork Alkahest (MWA), which is only available from dungeon drops, open world boss BAMs, and Locked Strongboxes, so it is an expensive item on the Trade Brokerage. The drop rates were reduced in the "TERA: Rising" expansion so the prices of this item are in flux right now, though on my server it runs 80g per unit.
You do NOT need to use Masterwork Alkahest to enchant a masterwork item up to +9. You can use the same alkahest as for a regular item. The MWA is only necessary for attempts to enchant +10, +11, and +12.
A new Alkahest reagant, Extensive Alkahest, was also added with "TERA: Rising". This reagant is found in specialty boxes bought from the cash shop (and, of course, on the Trade Brokerage). It provides an increased chance of success and can be used at any level of enchanting (so it can be used instead of Refined Alkahest or Masterwork Alkahest).
At this point I have no data on whether the extra cost of this alkahest is worth it for the increased success chance. It seems unlikely that it will ever be an affordable option for anything except masterwork enchant attempts (+10 to +12). The most likely scenario for using Extensive Alkahest is when the fodder costs start to dominate the cost of alkahest.
Enigmas
All endgame items have extra effects in addition to their base stats. These effects are listed in green text on the item tooltip. An item usually has a set of fixed effects that never change. Most endgame items also have random effects, which are indicated with ![]() . The effects on an item, whether they are fixed or random, are split into two groups: the item's base effects and, if the item is enchantable, its enchantment effects. Base effects are always active. Enchantment effects are only active once the item reaches the necessary enchantment level.
. The effects on an item, whether they are fixed or random, are split into two groups: the item's base effects and, if the item is enchantable, its enchantment effects. Base effects are always active. Enchantment effects are only active once the item reaches the necessary enchantment level.
An item with random effects (either a base effect or an enchantment effect) can have these random effects changed using the enigma system. This is affordable for regular enchantable items but quite costly for unenchantable items and masterworks.
You will sometimes notice significant price differences on the same items at the brokerage. This is usually because one item has desirable effects while another has crappy effects no one wants. The item with desirable effects is often said to have perfect stats; this simply means that it has all of the best random effects for a specific class or role. You can watch the brokerage for days looking for the exact effects you need, or you can buy the cheapest version of the item and then use the enigma system to try and get the effects you want.

An item is "Enigmatic" when its random effects have not been identified. It will have a blue "?" over its icon and the set of random effects will read "Unidentified effect (obscured by Enigma)". In order to find out the effects on an enigmatic item, you use a Common Identification Scroll (sold by standard merchants for 52s50c). When you use the scroll on the enigmatic item the scroll is consumed and the item's random effects are set.
You will never get two random base effects that are the same, and you will never get two random enchantment effects that are the same. However, random effects CAN duplicate pre-existing fixed effects. Likewise, a random base effect can duplicate a random enchantment effect. So it would be theoretically possible to get 4 copies of the same effect on an item: 1 as a fixed base effect, 1 as a random base effect, 1 as a fixed enchantment effect, and 1 as a random enchantment effect. Note that this restriction applies to the base and +1 to +9 effects only. Masterwork effects (+10 to +12) have somewhat different rules.
Re-rolling Items
If you have an item that has already been identified and you don't like its random effects, you can change the random effects by "re-rolling" the item (AKA "enigmatizing", "sealing/unsealing", or "re-identifying"). To do this you need to use a Common Enigmatic Scroll (sold by standard merchants for 5g25s). When you use this scroll on an enchantable item that has random effects, the random effects will be cleared and the item will return to an "Enigmatic" (unidentified) state. You can then use a Common Identification Scroll on the item in order to get new random effects.
Re-rolling an item does not reset its enchantment level. If it was a +7 item before, it will still be a +7 item after. However, you cannot use the common scrolls on masterwork items; they must be re-rolled with a Master Enigmatic Scroll (AKA ME or MES) and an Intricate Identification Scroll. You may see references to an Intricate Enigmatic Scroll, but these are not in the game and in most cases they meant a Master Enigmatic Scroll. Unidentified effects on Enigmatic Masterwork items show up as "Unidentified effect (obscured by Intricate Enigma)" and the item's tooltip will also show "Requires Intricate Identification Scroll to Remove Intricate Enigma" as a reminder to use the correct scrolls.
In addition to the special scrolls needed for masterworks, there is also a special Semi-Enigmatic Scroll. This scroll must be used when you want to re-roll random effects on items that are not enchantable, such as jewelry. The Semi-Enigmatic Scroll cannot be bought from a vendor; they come mainly from open world BAM drops. You can buy them on the brokerage, but they are not cheap.
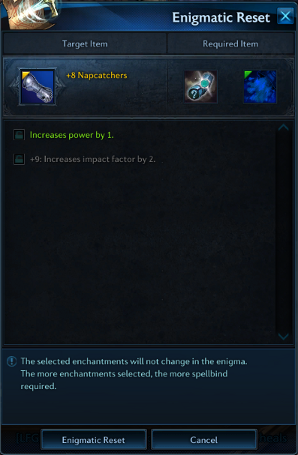
Once you've figured out the scrolls to use, you may come to realize that the chance of getting the exact effects you want on a re-roll are pretty slim when you start talking about two or three random effects at once. To help with the odds you can use Spellbind to lock effects. When you use a Common Enigmatic Scroll on an item you are presented with a dialog which shows all of the random effects on the item. If you want to keep one of these effects you can lock it. A locked effect will not change when you reset the random effects.
The amount of Spellbind required to lock an effect is equal to the tier of the item for the first and second effect, the tier times 2 for the third effect, the tier times 3 for the fourth effect, and so on.
For instance, locking one effect on a tier 12 item would require 12 Spellbind, while locking three effects would require:
12 + 12 + (12 * 2) = 48 Spellbind
It's important to note that you must use Spellbind to lock the effects you want to keep on EVERY re-roll attempt. The lock is not permanent and the effect is only preserved for that one use of the Common Enigmatic Scroll.
The high cost of Spellbind compared to the low costs of common scrolls means it may not make sense to bother locking effects when re-rolling regular items. Re-rolling masterwork items, however, requires far more expensive scrolls and the use of Spellbind usually makes sense in that case.
In "TERA: Rising", Spellbind was removed from the vendors. It is now a rare drop as well as an item found in specialty lockboxes purchased from the cash shop. You can buy it from the Trade Brokerage as well, but because of these recent changes the prices are in a state of flux.
Using the enigma system to get the exact effects that are most beneficial to your class, role, and playstyle is a major part of improving your endgame gear. The list of possible effects that can be randomly generated is dependent on the type of equipment.
Weapon Random Effects
- Increases PvP damage dealt by 4.
- Do 4.5% more damage when you attack boss monsters.
- Do 4.5% more damage when you attack normal monsters.
- Do 4.5% more damage when you attack minions.
- Do 5.1% more damage when you attack monsters from behind.
- Do 5.3% more damage when you attack prone monsters.
- Do 6% more damage when you attack enraged monsters.
- You deal 3% extra damage to the target with the highest aggro to you.
- Increases attack speed by 8%.
- 0.2% of your total MP instantly returns when you use a skill.
- 50% chance to regenerate MP when combat starts.
- Your attacks draw 13.5% more aggro. (Lance only)
- Receive 7% more healing. (Staff/Scepter only)
- Your skills produce 6% less aggro. (Staff/Scepter only)
Body Armor Random Effects
- Decreases PvP damage taken by 3.
- Damage from boss monsters decreases by 4.5%.
- Damage from normal monsters decreases by 4.5%.
- Damage from minions decreases by 4.5%.
- You take 3% less damage from frontal attacks.
- You take 5.3% less damage from attacks while knocked down.
- You take 6% less damage from enraged monsters.
- You take 3% less damage from the monster with highest aggro to you.
- Reflects 15% of damage to the attacker.
- Heal 0.11% of total HP instantly when skill hits target.
- 30% chance to regenerate HP when combat starts.
- Increases balance while using a skill by 18%.
- Increases HP restoration by 8.6%.
Hand Armor Random Effects
- Increases power by 1.
- Increases your crit rate by 2.
- Increases impact factor by 2.
- You take less damage from crits.
- Increases healing 4.5%. (Sleeves only)
- Your attacks draw 6.7% more aggro. (Gauntlets/T14 Gloves only)
Foot Armor Random Effects
- Increases endurance by 1.
- Increases resistance to crits by 2.
- Increases Balance Factor by 2.
- Increases balance and chance to resist stun while under boss's feet by 30%.
- Increases your movement speed by 1.5%.
- Decreases duration of slowing effects by 0.7.
Earring Random Effects
- Decreases poison damage by 15%.
- Decreases duration of stun effects by 10%.
- Increases resistance to stun effects by 1.9%.
- Increases resistance to periodic damage effects by 2.6%.
- Increases resistance to weakening effects by 2.3%.
- Increases HP restoration by 4.3%.
Ring and Necklace Random Effects
- Increases crit damage by +0.04.
- Increases your crit rate by 2.
- Increases stun effects on opponents by 2.3%.
- Increases periodic damage on opponents by 3%.
- Increases weakening effects on opponents by 2.6%.
- Increases healing 4.5%.
Masterwork
A masterwork item (MW) is an item that can be enchanted to +12 instead of just +9. An item does not need to have a +12 enchantment level currently in order to be a masterwork. The masterwork status merely indicates that it CAN be enchanted to this level. Masterwork items are identified by a "Masterwork" prefix, as well as a golden tooltip border and this icon: ![]() . A Masterwork item may also increase the power of some of its effects. For instance, an effect with a 7.5% modifer might become an 8% or 8.5% modifier.
. A Masterwork item may also increase the power of some of its effects. For instance, an effect with a 7.5% modifer might become an 8% or 8.5% modifier.
Remember that masterworking an item merely makes it POSSIBLE to enchant it past +9. You still then have to do the actual enchanting process, and enchanting top-tier items to +12 is an incredibly expensive prospect. You should only consider doing this for the very best gear, and it's not something you need to worry about when you first hit 60. In fact, all of TERA's PvE content can arguably be done with +9 gear, perhaps only really requiring a masterwork weapon. PvP can be a bit more harsh and +12 may be necessary to stay competitive. Nevertheless, having all top-tier masterwork items represents the pinnacle of gear progression in TERA. In fact, enchanting an item to +12 is such a momentous event that the entire server is notified each time it happens.
Masterworking an item piggy-backs on the enigma re-rolling system. Every time you re-roll an item there's a chance that it can become a masterwork (except for items that specifically state they cannot be made into a masterwork in their tooltips). There are two approaches you can take to masterwork an item:


Method 1: Use a Common Enigmatic Scroll followed by a Common Identification Scroll, just as if you were re-rolling the item. Each attempt has a 1 in 2000 chance (0.05%) of producing a masterwork. With this method your expected average number of attempts (the over-under) is around 1350. Each attempt has a vendor cost of 5g77s50c.


Method 2: Start with a Master Enigmatic Scroll scroll. When an MES is used the resulting enigmatic item will have a golden "?" instead of the normal blue one. When this golden enigmatic item is identified using an Intricate Identification Scroll (sold by the general merchants for 52g50s) there is a 3% chance that the item will become a masterwork. With this method, your expected average number of attempts (the over-under) is about 22. The cost of each attempt is affected by the current brokerage price for ME scrolls on your server.
Which process is better? Well, the numbers suggest that using the common scrolls becomes cheaper on average once ME scrolls cost more than 300g. However, the common scroll method also involves clicking several thousand scrolls, and the value of the time spent clicking can't be ignored in your decision.
Regardless of the method you choose, once you have created a masterwork item, you MUST use a Master Enigmatic Scroll and an Intricate Identification Scroll in order to re-roll random effects on that item. This makes the process of re-rolling for the desired effects on masterworks much more expensive than for normal items. As long as you use these expensive scrolls for re-rolling, the item is guaranteed to remain a masterwork.
There is one final wrinkle with masterwork items. Every masterwork has a hidden bonus effect that is randomly set to 1%, 2%, or 3%. This modifier affects the ilvl bonus and the amount of base stats such as attack, balance, etc. Strictly speaking the very best +12 masterwork item is the one that has the random 3% bonus, though practically speaking this difference is dwarfed by the gains from simply enchanting to +12.
You can use this tool to see how the hidden bonus impacts the base stats on a number of endgame items. The only way to know the value of the hidden bonus on your masterwork is to compare its base stats against this tool or against other identical masterwork items at identical enchantment levels. Every time you re-roll a masterwork this hidden bonus is reset, so you can perfect it by re-rolling just as you would for normal random effects. Unfortunately, there is no way to lock the bonus modifier like you can with regular random effects.
In KTera the masterwork process was called "luxing", and you may still hear it referred to by that term from time to time. The luxing process in KTera is somewhat different than the masterwork process in North American TERA, so you may find misleading or confusing information about the process when searching for details.
Crystals
The crystal system in TERA is where situational adaptability comes into play. Rather than carrying around multiple gear sets or swapping enchants like you might in other MMORPG's, in TERA your gear's base stats and effects are designed to aid you in all scenarios. When you need to adapt to a specific fight you do it by customizing your cystal setup instead. Crystals are not destroyed when removed from your gear, so it doesn't cost anything to swap your crystal setup for specific situations.

If you hadn't found this feature yet, you can save different gear sets on your character sheet. These saved sets include the crystals you have equipped. This makes it easy to swap crystal setups; just save multiple sets with identical gear but different crystals. You can use this to tailor your crystal setup for specific content (e.g. killing minions vs BAMs) or to easily swap between cheap and expensive crystal sets for trash and boss fights in case you have a stupid wipe.
All superior endgame weapons and armor each have 4 crystal slots. The exact crystals you use for your class and role are not something I try to cover here. Your best bet at finding a good crystal setup is to start at the TERA forums for your class and look for the guides that are usually stickied there.
The crystals you use at level 60 are crux crystals. You can buy the common versions from any standard crystal merchant, and the "pristine" common versions from the specialty Vanarch merchants. The more powerful uncommon and "fine" versions of crystals are drops from mobs and can be found at the Trade Brokerage.
For initial content at 60 you can probably get away with using common crystals, especially for pre-mades, but if you use instance matching and run PuGs you will often be expected to have the expensive uncommon crystals.
Crystalbind
When you die in TERA there is a chance that one of the crystals in your gear will be destroyed. The cost of buying replacement crystals is the end-game death/progression gold sink and serves the same purpose as repair costs in other MMORPG's. You should always carry around extra crystals!
To help with costs, you can use crystalbind scrolls to protect your crystals when you die. Instead of a crystal being destroyed, the crystalbind is consumed. These scrolls are drops from many of the end-game instances, and a non-tradeable version is also one of the rewards from the Locked Strongboxes added in "TERA: Rising". The cost of these scrolls is usually lower than the cost of replacing uncommon crystals.
However, you have to use the scroll ahead of time to protect yourself, and they don't last forever: 1hr for Crystalbind and 12h for Complete Crystalbind. This means you are banking on dying each time you use one. Crystalbinds are a good way to reduce costs at the cutting edge of progression, or as cheap protection against the inevitable Nexus-lag mystery death.
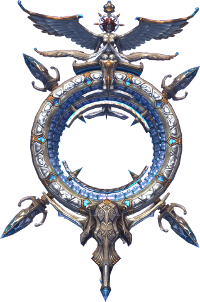
Jewelry & Zyrks
When you first hit 60 one of the cheapest and simplest ways you can improve your ilvl is to update your jewelry. These are your two earrings, your two rings, and your necklace. The quest rewards as you approach and first hit 60 typically leave these slots badly under-geared. You also want to have rings and earrings with crystal slots.

The crystals used with jewelry are not the normal armor and weapon crystals. Crystals for jewelry are called zyrks, and they come from reptuation vendors and dungeon drops. You should have no problem finding affordable zyrks on the brokerage. This guide won't try to cover which zyrks make the most sense for your class and role. The guides in your class forums should provide starting points for this information.
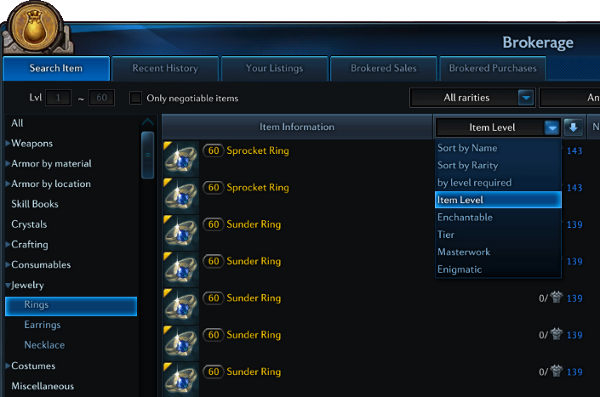
The best way to deck out your jewelry is still to just hit the Trade Brokerage. Because the prices and availability of specific items may vary, you'll want to learn how to use the advanced filtering, sorting, and searching features in the brokerage. In this case you want to filter your results by only the relevant jewelry categories and then sort by item level.
For earrings you can probably afford a Baby's Sigh (141) or Caged Raindrop (141). The BoE, best-in-slot earring (BiS) is Queen's Call (153), and there are a number of other earrings with item levels between 141 and 153. If you see one at an affordable price, by all means, grab it.
The rings you can likely afford are the Grooved Setting (133) and Quaver Ring (133). The BoE, BiS ring is the Queen's Signet (145). As with earrings there are a number of other rings between these two levels.
There are also a number of BoP reputation rings available with item level 139. Don't blow a ton of cash on a 139 ring without looking at these too: Shariar Setting, Hyderad Setting, and Valsekyr Setting.
The affordable necklaces will be a Practicum Necklace (139) or Windswept Pendant (139). The BoE, BiS item is the Crown Jewels (147).
There are other sources of jewelry that are BoP or BoE (cannot trade), and these items won't be found on the Trade Brokerage. Depending on your class and build, some of these items may actually be better for you than the BoE, BiS items mentioned above. While this won't greatly impact your choice of what to start with as a fresh 60, it's important to know where to look next. The Bellicarium faction, CoF dungeon, and SG dungeon all have high level jewelry with stats that might be better for your build.
Other Stuff
There are a few miscellaneous things worth mentioning that can affect your progress as a character and your performance in PvE, but don't necessarily tie into any specific gear topics.
Scrolls & Charms
Don't forget to use your campfire charms! They have a noticeable impact on your performance in groups. You can get uncommon and rare charms from the specialty Vanarch vendors.
Likewise, you should know about consumable scrolls. These are self-buff items you can make with the alchemy crafting skill. These last 8 minutes and are great for important things like boss fights. With the crafting skill missions available at the mission board, and the cheap ingredients used by these scrolls, it's very easy to get to the point where you can make these for yourself. Or simply buy them off the brokerage, they are not expensive. You can have one offensive and one defensive scroll buff active at a time, so you'll have to figure out which ones are best for your scenario.
- Scroll of Impact V
- Scroll of Savagery V
- Scroll of Carving V
- Scroll of Switfness V
- Scroll of Tenacity V
- Caduceus Scroll V
Advanced Glyphs & Glyph Toggles
The glyphs you buy from your glyph trainer are not the only glyphs available to your character. There are also a few Advanced Glyphs (AKA "Silver Glyphs", "Master Glyphs") that you can acquire. These typically replicate existing glyphs but cost fewer glyph points, which ultimately lets you include more glyphs in your build.
You can buy these advanced glyphs (and check out what is available) from the badge merchants near the Forgeheart in Kaiator and from the talent agents at the Arcane Symposium in Allemantheia. The badge vendors only accept Practicum Badges and Dire Badges, which drop from the Temple of Temerity instance. The talent agents only accept Silver Talents and Gold Talents, which drop from Sirjuka Gallery. The random glyph boxes bought with Silver Talents can contain a glyph from either ToT or SJG.
It's also worth mentioning that you can save multiple glyph setups. You must use a Glyph Toggle to swap between these setups, which is sold from regular merchants for 16g. This is not essential for PvE performance but it is a convenient way to try out alternative setups or to swap between major activities (e.g. PvP vs PvE).
Specialty Vanarch Merchant
Multiple times in this guide I've mentioned specialty Vanarch merchants. These are merchants that you cannot find in the capital cities. They are found only in the smaller towns, and whether they are open or not depends on the Vanarch ruling the area. If you are wondering what a Vanarch is, I suggest you take a moment to read about TERA's end-game guild politics system.
These specialty Vanarch merchants sell the Refined Alkhest that you'll need for enchanting, pristine cystals with stats you won't find at the regular crystal merchant, scrolls to teleport you to all of the dungeons, better charms for your campfires, and a few other useful odds and ends.
Belliwho?
The Bellicarium and Killing Spree factions are the PvP factions in TERA. While the offical game guide tells you all about the PvE factions (including where to find them), the reputation vendors for the two PvP factions are a bit trickier to locate. They are found inside the Command Center in Kaiator; you must talk to the guard near the Command Center entrance in the Forgeheart area to teleport inside. In addition to PvP gear and items, these merchants also have other cool stuff, such as unique templates for remodeling.
Instance Progression
To fully understand the instance hiearchy and progression path it's helpful to know a bit about the launch history of TERA. TERA is actually an import of an active Korean game (often referred to as KTera in English), and when KTera launched the level cap was 58. In conjunction with TERA being released to North America by EnMasse, the level cap was raised to 60 and some dungeons and content were shuffled around accordingly.
This left some of the content and gear in a confusing state. A lot of these problems were ironed out in the Argon Queen expansion by simply obsoleting big swaths of content from an "end-game progression" perspective. Also, a lot of gear that was originally BoP was changed to BoE, with the result that you could simply buy your way into the first tiers of end-game gear that you once had to farm for (though with enchanting this is less helpful than it might seem).
When you join an instance you have never been in before, you will get a rookie bonus (and a rookie fairy). Among other things, this bonus improves the drop rates for boss loot. The idea is to reward groups for helping you through an instance for the first time. The item levels listed here correspond to the item level requirements in the dungeon finder, but if you are a rookie in the instance then you may want to wait until you are a few ilvls higher than these recommended minimums, especially for hard modes.
I've listed the instances in order of easiest to hardest (roughly). I've included the common abbreviations for each instance used on my server. People often add a NM or HM suffix to specify normal mode or hard mode runs. I've also included items necessary to properly run the instance. Some dungeons in TERA require "keying", or completing a quest sequence and getting a specific consumable item,  in order to enter the instance or survive special mechanics. All of this information is available in-game using the instance matching tool, which you can open by clicking on the red crypt icon beneath the radar.
For posterity I'm going to include the progression as it existed before the Argon Queen patch as well. If you are just hitting level 60 today, however, you have the option of skipping ahead. As I cover in the gear section, most people freshly arriving at 60 will be able to immediately get their gear score to about 147. Because of this you may choose to bypass a lot of these instances and start on normal mode Argon Corpus runs.
- Suryati's Peak (115) - SP
- Labyrinth of Terror (124) - LOT (requires Potion of Will)
- Ebon Tower (124) - ET
- Kelsaik's Nest (131) - KN (requires Torch of the Gods)
- Temple of Temerity (138) - TOT
- Labyrinth of Terror Hard (138) - LOTHM
- Fane of Kaprima (138) - FOK
- Ebon Tower Hard Mode (138) - ETHM
- Balder's Temple (138) - BT (requires Dampening Shroud)
- Fane of Kaprima Hard Mode (142) - FOKHM
- Balder's Temple Hard Mode (142) - BTHM (requires Dampening Shroud)
- Kelsaik's Nest Hard Mode (142) - KNHM
- Argon Corpus (142) - AC
- Crucible of Flame (142) - COF
- Nexus Traverse (145) - NT (raid, 7 player minimum, only open after Nexus invasions)
- Sirjuka Gallery (147) - SG, SJG
- Argon Corpus Hard Mode (147) - ACHM
- Manaya's Core (147) - MC
- Manaya's Core Hard Mode (153) - MCHM
Gear Sets
The gear sets in TERA are classified by tier, enchantability, and purpose (PvE or PvP). Most sets have a unique name that applies across all classes. This makes it easier to talk about a set in the abstract sense. Likewise, these named sets drop from the same instance/boss or are purchased from the same reputation vendor for all classes, so there are very few class-specific issues to worry about.
Endgame sets exist at tier 12, tier 13, and tier 14. However, the sets at T12 are virtually obsolete. I am not including the few rare sets that exist (e.g. Deception) and I am not including T12 sets at all. The T12 starter set was called the Sleeper set (sometimes known as the Rebirth set), and you may still see it mentioned from time to time.
Advice For New Level 60s
A fresh level 60 should have a full set of T12 questing gear with an item level around 127. You hopefully have about 5000g for an initial budget after grabbing all of your skills and glyphs. Once you have all the dailies unlocked you can make around 1800g a day if you are an elite status player using your buffs. Assuming PvE is your goal, your target is to use this budget to get your item level to about 147, which is sufficient to handle any instance up to and including normal mode Argon Corpus and Nexus Traverse runs.
You'll want to start by updating your jewelry and zyrks. Be sure to budget for uncommon crystals for your gear. For PvE, buy your T13 Discord set weapon and enchant it to +7. Unless you are extremely unlucky you should still be left with a few thousand gold at this point for your armor. Your goal is to fill in the armor slots with whatever you can afford to reach 147. Getting Discord pieces to +6 can certainly work (and is not that expensive), but there are other options too so the prices and availability at your Trade Brokerage will be a driving factor.
There is also an off-set, unenchantable option for your body and weapon slots that can be acquired through a very short rep grind. These items rival the T14 Bloodvision set and are sold by Jax Trust for melee classes and Unified Theory Institute for ranged/magic classes. If you are an elite status player using your buffs you can grind out the necessary rep and credits for the body armor in about a week.
I still recommend starting with a T13 Discord weapon to +7 since this should let you handle initial endgame content while grinding out Jax/UTI credits. Once you have enough credits for your first Jax/UTI item, the body armor is likely going to give you a bigger bang for your buck since you'll already have your T13 weapon (hopefully enchanted to +9 by then). This means you can cheap out a bit on whatever body armor you pick up first at level 60 as long as you plan to upgrade to the Jax/UTI body armor as soon as possible. At that point you can figure out if grinding Jax/UTI again for the weapon makes sense as your next upgrade, or if jumping straight into T14 weapons is more cost effective.
If you plan to focus on PvP at endgame you'll want to look at the Victor's set as your starting point. The PvP armor sets have effects that increase or reduce PvP damage and these effects are critical for competitive PvP because they have a significant impact on your damage output and intake against other players. Generally you want to avoid these sets for PvE since they have fewer useful effects dedicated to PvE content.
NOTE: Tera Codex and Tera Tome both are not up to date with "TERA: Rising". As a result there are some items for which I simply don't have links. There are also some items that have changed; in particular with regard to BoP/BoE changes. I have tried very hard to verify all of my info against in-game items.
PvE gear
- Decreases cooldown of Second Wind by 10%.
- Restores 50 MP when Leash effect hits target.
- Increases damage of Spring Attack by 15%.
- Decreases cooldown of Shield Counter by 10%.
- Increases damage of Shield Counter by 17%.
- Decreases cooldown of Challenging Shout by 10%.
- Decreases cooldown of Shield Bash by 10%.
- Restores 75 MP when Pledge of Protection is used.
- Restores 50 MP when Onslaught effect hits target.
- Increases damage of Onslaught by 15%.
- Increases duration of Flurry of Blows effect by 17%.
- Restores 60 MP when Inescapable Doom effect hits target.
- Decreases cooldown of Inescapable Doom by 5%.
- Increases damage of Lethal Strike by 15%.
- Increases duration of Triumphant Shout effect by 20%.
- Decreases cooldown of Tenacity by 10%.
- Increases damage of Staggering Strike by 25%.
- Increases damage of Flatten by 10%.
- Increases damage of Cyclone by 8%.
- Increases damage of Thunder Strike by 8%.
- Decreases cooldown of Battle Cry by 12%.
- Restores 50 MP when Pounce skill hits target.
- Increases damage of Rising Fury by 12%.
- Increases damage of Vortex Slash by 12%.
- Decreases cooldown of Death From Above by 10%.
- Restores 50 MP when Torrent of Blows skill hits target.
- Increases damage of Rain of Blows by 12%.
- Decreases cooldown of Blade Draw by 10%.
- Increases damage of Blade Draw by 10%.
- Resores 40 MP when Knockdown Strike skill hits target.
- Decreases cooldown of Tenacity by 10%.
- Decreases cooldown of Overpower by 12%.
- Decreases cooldown of Startling Kick by 10%.
- Decreases cooldown of Backstab by 5%.
- Decreases cooldown of In Cold Blood by 15%.
- Increases damage of Whirlwind by 10%.
- Increases damage of Overhand Strike by 10%.
- Increases duration of Triumphant Shout effect by 20%.
- Restores 50 MP when Velik's Mark skill hits target.
- Decreases cooldown of Breakaway Bolt by 12%.
- Increases duration of Poison Arrow effect by 17%.
- Increases duration of Close Quarters effect by 5%.
- Decreases cooldown of Stunning Trap by 10%.
- Decreases cooldown of Rain of Arrows by 10%.
- Increases damage of Arrow Volley by 10%.
- Increases damage of Penetrating Arrow by 10%.
- Increases damage of Radiant Arrow by 10%.
- Decreases cooldown of Backstep by 10%.
- Decreases cooldown of Mana Barrier by 15%.
- Decreases cooldown of Teleport Jaunt by 10%.
- Decreases cooldown of Glacial Retreat by 10%.
- Increases damage of Flaming Barrage by 15%.
- Increases power of Mana Siphon by 17%.
- Increases power of Mana Infusion by 10%.
- Increases damage of Hail Storm by 10%.
- Increases damage of Void Pulse by 10%.
- Increases damage of Fireblast by 10%.
- Decreases cooldown of Fiery Escape by 15%.
- Increases speed of Mana Charge by 15%.
- Decreases cooldown of Energy Stars by 10%.
- Decreases cooldown of Kaia's Shield by 10%.
- Increases duration of Restorative Burst effect by 15%.
- Decreases cooldown of Shocking Implosion by 10%.
- Increases damage of Shocking Implosion by 15%.
- Increases healing of Healing Circle by 10%.
- Increases duration of Regeneration Circle effect by 10%.
- Increases healing of Focus Heal by 15%.
- Restores 175 MP when Thrall of Life is used.
- Restores 175 MP when Thrall of Protection is used.
- Restores 110 MP when Sonorous Dreams effect hits target.
- Increases duration of Volley of Curses effect by 15%.
- Increases damage of Metamorphic Smite by 17%.
- Restores 175 MP when Vow of Rebirth effect hits target.
- Decreases cooldown of Shara's Lash by 10%.
- Restores 100 MP when Mire effect hits target.
- Restores 75 MP when Titanic Wrath is used.
- Decreases cooldown of Teleport Jaunt by 7%.
PvP gear
- Decreases cooldown of Second Wind by 10%.
- Restores 50 MP when Leash effect hits target.
- Increases damage of Spring Attack by 15%.
- Decreases cooldown of Shield Counter by 10%.
- Increases damage of Shield Counter by 17%.
- Decreases cooldown of Challenging Shout by 10%.
- Decreases cooldown of Shield Bash by 10%.
- Restores 75 MP when Pledge of Protection is used.
- Restores 50 MP when Onslaught effect hits target.
- Increases damage of Onslaught by 15%.
- Increases duration of Flurry of Blows effect by 17%.
- Restores 60 MP when Inescapable Doom effect hits target.
- Decreases cooldown of Inescapable Doom by 5%.
- Increases damage of Lethal Strike by 15%.
- Increases duration of Triumphant Shout effect by 20%.
- Decreases cooldown of Tenacity by 10%.
- Increases damage of Staggering Strike by 25%.
- Increases damage of Flatten by 10%.
- Increases damage of Cyclone by 8%.
- Increases damage of Thunder Strike by 8%.
- Decreases cooldown of Battle Cry by 12%.
- Restores 50 MP when Pounce skill hits target.
- Increases damage of Rising Fury by 12%.
- Increases damage of Vortex Slash by 12%.
- Decreases cooldown of Death From Above by 10%.
- Restores 50 MP when Torrent of Blows skill hits target.
- Increases damage of Rain of Blows by 12%.
- Decreases cooldown of Blade Draw by 10%.
- Increases damage of Blade Draw by 10%.
- Resores 40 MP when Knockdown Strike skill hits target.
- Decreases cooldown of Tenacity by 10%.
- Decreases cooldown of Overpower by 12%.
- Decreases cooldown of Startling Kick by 10%.
- Decreases cooldown of Backstab by 5%.
- Decreases cooldown of In Cold Blood by 15%.
- Increases damage of Whirlwind by 10%.
- Increases damage of Overhand Strike by 10%.
- Increases duration of Triumphant Shout effect by 20%.
- Restores 50 MP when Velik's Mark skill hits target.
- Decreases cooldown of Breakaway Bolt by 12%.
- Increases duration of Poison Arrow effect by 17%.
- Increases duration of Close Quarters effect by 5%.
- Decreases cooldown of Stunning Trap by 10%.
- Decreases cooldown of Rain of Arrows by 10%.
- Increases damage of Arrow Volley by 10%.
- Increases damage of Penetrating Arrow by 10%.
- Increases damage of Radiant Arrow by 10%.
- Decreases cooldown of Backstep by 10%.
- Decreases cooldown of Mana Barrier by 15%.
- Decreases cooldown of Teleport Jaunt by 10%.
- Decreases cooldown of Glacial Retreat by 10%.
- Increases damage of Flaming Barrage by 15%.
- Increases power of Mana Siphon by 17%.
- Increases power of Mana Infusion by 10%.
- Increases damage of Hail Storm by 10%.
- Increases damage of Void Pulse by 10%.
- Increases damage of Fireblast by 10%.
- Decreases cooldown of Fiery Escape by 15%.
- Increases speed of Mana Charge by 15%.
- Decreases cooldown of Energy Stars by 10%.
- Decreases cooldown of Kaia's Shield by 10%.
- Increases duration of Restorative Burst effect by 15%.
- Decreases cooldown of Shocking Implosion by 10%.
- Increases damage of Shocking Implosion by 15%.
- Increases healing of Healing Circle by 10%.
- Increases duration of Regeneration Circle effect by 10%.
- Increases healing of Focus Heal by 15%.
- Restores 175 MP when Thrall of Life is used.
- Restores 175 MP when Thrall of Protection is used.
- Restores 110 MP when Sonorous Dreams effect hits target.
- Increases duration of Volley of Curses effect by 15%.
- Increases damage of Metamorphic Smite by 17%.
- Restores 175 MP when Vow of Rebirth effect hits target.
- Decreases cooldown of Shara's Lash by 10%.
- Restores 100 MP when Mire effect hits target.
- Restores 75 MP when Titanic Wrath is used.
- Decreases cooldown of Teleport Jaunt by 7%.
comments powered by Disqus